
Click below for a full screen walkthrough video.
▶️ Enabling Reported Threats Delete for Microsoft
Part 1: Adding API Permissions in Azure Active Directory
This part should have been completed in your initial technical integration but may need to be reviewed.
- Visit https://entra.microsoft.com/.
- Click App Registrations.

- Click View All Applications in the directory.

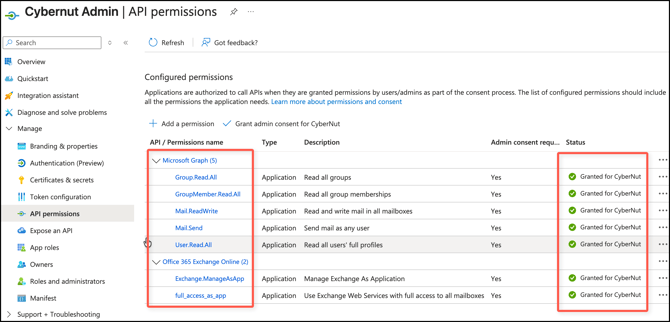
- Search for and click CyberNut Admin.

- Verify that you have the following permissions granted. (inc Mail.ReadWrite)
- If the permissions are set you can move on to Part 2 below. If they are not set complete the procedures here.
Part 2: Creating and Managing a Self-Signed Certificate
Creating a Certificate Using PowerShell (or Terminal on a Mac)
Open PowerShell with administrative privileges on your district machine and execute the following script. Please replace "YourStrongPasswordHere" with any password of your choice. You will only need this password once when uploading your certificate to the CyberNut Admin Portal.
# Define certificate parameters
$certDnsName = "CyberNutCert"
$certPassword = ConvertTo-SecureString -String "YourStrongPasswordHere" -Force -AsPlainText
$certDirectory = "C:\Certificates"
$certPfxPath = "$certDirectory\CyberNutCert.pfx"
$certCerPath = "$certDirectory\CyberNutCert.cer"
$certValidityPeriod = 365  # Valid for 1 year

# Create the directory if it doesn't exist
if (-Not (Test-Path -Path $certDirectory)) {
    New-Item -ItemType Directory -Path $certDirectory
}

# Create a new self-signed certificate
$cert = New-SelfSignedCertificate -DnsName $certDnsName -CertStoreLocation "cert:\LocalMachine\My" -KeyExportPolicy Exportable -KeySpec Signature -NotAfter (Get-Date).AddDays($certValidityPeriod)

# Export the certificate to a .pfx file with a password
Export-PfxCertificate -Cert $cert -FilePath $certPfxPath -Password $certPassword
Write-Host "Certificate created and exported to $certPfxPath"

# Import the certificate into the Current User's certificate store
$certImported = Import-PfxCertificate -FilePath $certPfxPath -CertStoreLocation "Cert:\CurrentUser\My" -Password $certPassword
Write-Host "Certificate imported successfully into the CurrentUser\My store."

# Optionally export the public certificate to a .cer file
$thumbprint = $certImported.Thumbprint.ToUpper().Trim()
$certToExport = Get-ChildItem -Path "Cert:\CurrentUser\My" | Where-Object { $_.Thumbprint.ToUpper().Trim() -eq $thumbprint }

if ($certToExport) {
    Export-Certificate -Cert $certToExport -FilePath $certCerPath
    Write-Host "Public certificate exported to $certCerPath"
} else {
    Write-Host "Certificate not found in the store. Public certificate export skipped."
}

Write-Host "Script completed successfully."
Locate the certificate.
The output of this Powershell script will indicate where both CyberNut certificate files are saved. You should have two certificates with the extensions .pfx and .cer.
Uploading the Certificate to Azure
Go to Microsoft Entra admin center at https://entra.microsoft.com/ and click App Registrations and then View all applications in the directory.

Click the CyberNut Admin app.
Click Certificates & secrets section, click on Upload Certificate and upload the .cer file you previously generated using the Powershell script.

You should now see your uploaded certificate in this section.

Assigning Exchange Administrator Role
Lastly, please click on Roles and Administrators in your CyberNut Admin app registration and click the blue hyperlink that says here.

Search for the Exchange Administrator role in the input field and select the words (not the checkbox).

On the next screen, click on Add Assignments and search for CyberNut Admin. Click the checkbox and click add to assign the role.

Now, under Exchange Administrator | Assignments, you should see CyberNut Admin is assigned as indicated below.

Upload CyberNut .pfx file to CyberNut Admin Portal
Visit the CyberNut Admin Portal at http://admin.cybernut.com and login via SSO. Click on Settings >Threat Manager.
Then click the Upload button under Microsoft Certificate.
Upload the the .pfx generated by the Powershell script for your certificate.
Enter the same password you created in the Powershell script and enable the Reported Threats Delete toggle at the top. Click Save when you are finished.
Note: Ensure you are entering the same password from the Powershell script. If there is a typo, your threats will not delete!