
▶️ Advanced Threat Search (Google)
Part 1: Update Domain Wide Delegation Scopes
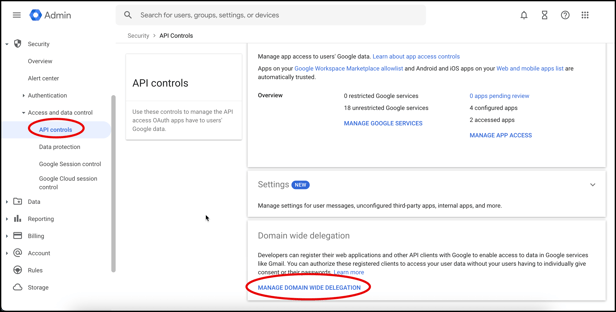
- Log in to the Google Admin Console at https://admin.google.com
- Click Security> Access and data control> API controls. Then click Manage Domain Wide Delegation.
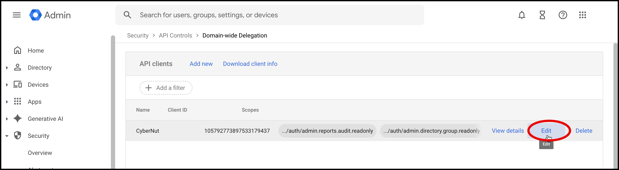
- Click Edit on the row with CyberNut listed.
- Scroll down and verify if the address below is included. If it's not included, copy/paste the following OAuth scope and click Authorize and then Confirm.
https://www.googleapis.com/auth/admin.reports.audit.readonly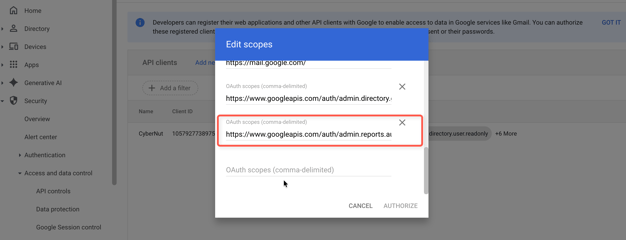
Note: It may take up to 24 hours before you can use this feature once you have updated the OAuth scope.
Part 2: Conduct an Advanced Threat Search in the
CyberNut Admin Portal
- Login to the CyberNut Admin Portal at http://admin.cybernut.com and select Advanced Threat Search.
 10. Set your search timeframe to focus on recent threats and reduce noise from older activity.
 11. Easily identify potential recipients of suspicious messages and evaluate your risk. Search by recipient, email subject or message ID to pinpoint specific emails and view the number of users who received them.
 12. Run your threat search to uncover all matching emails and identify potential victims organization-wide.
 13. To properly address the suspicious email, thoroughly examine its contents and assess the potential risks and number of recipients.
 14. Examine the full message details including headers, sender authentication, and threat indicators to confirm it's malicious.
 15. Click on the email to take action and resolve the attack.
 16. Choose your action to neutralize this threat and prevent further damage.
 17. As an example, you may permanently remove malicious emails from all inboxes to eliminate the threat completely—no chance of accidental reopening.
 18. Execute the remediation to protect your users and close this security incident in seconds.
Remediation Actions
Quarantine- The email will be moved to the user trash and auto-deleted after 30 days.
Quarantine All from Domain- All the emails from this domain will be moved to the user trash and auto-deleted after 30 days.
Quarantine All from Sender- All the emails from this sender will be moved to the user trash and auto-deleted after 30 days.
Delete this- The email will be permanently deleted from the user inbox.
Delete All from Domain- All the emails from this domain will be permanently deleted across all user inboxes.
Delete All from Sender- All the emails from this sender will be deleted across all user inboxes.
Note: It may take up to 24 hours before you can enable this feature once you have updated the OAuth scope.